This year my "wearing o' the green" involved a bit of recycling one of the Munchkin's tee shirts (green), fabric color (green) and an earth theme (green).


I am more of an orange person anyway - and was excited to find this for my new iron:


 Upcycled Child’s Art Smock
Quickly turn a men’s dress shirt into a long sleeved art smock that your child can put on all by themselves.
Materials:
· Men’s dress shirt
· Sweatshirt (with neck large enough to fit over child’s head and cuffs large enough to fit over child’s hands)
· Thread
· Sewing Machine
· Scissors
· Pins
Instructions:
· Remove the cuffs and collar from the sweatshirt, leaving approximately 1” of the sweatshirt attached to each. (I used a new sweatshirt that I plan to use for a quilted sweatshirt jacket, but you could use any sweatshirt – this would be a good new life for a stained shirt)
· Remove the collar of the dress shirt, cutting just below the collar line.
· Try the dress shirt on your child, having them put it on backwards, and see how long you want the sleeves to be. You are adding a cuff that will hold the sleeve up, so you can work in some “growing room” in your finished length.
 o Remove the lower sleeves of the dress shirt, cutting as straight across the sleeve as possible.
(NOTE – save the buttons off the cuffs for future projects –and if your shirt is 100% cotton, you can add the cut off pieces to your quilt scrap bin!)
Stitching the Collar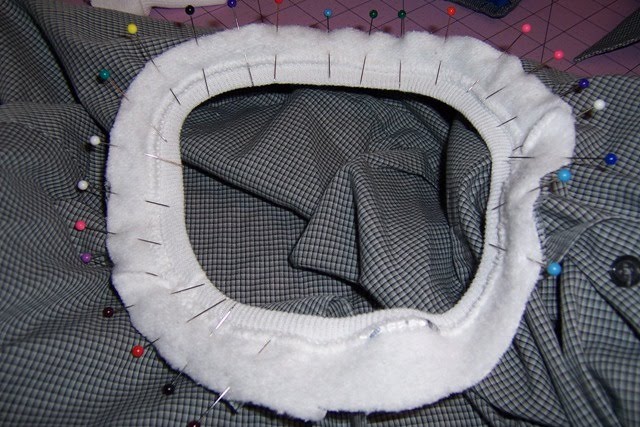
· Pin the collar piece to the top edge of the shirt, right sides together. Start in the center front and pin the dress shirt around the collar as far as it will go, overlapping the shirt ends in the back if needed.
o Be sure you are pinning and sewing into that extra bit of sweatshirt you left attached to the collar. You still want your collar to be able to stretch and you don’t want to sew it directly to the shirt.
 · Stitch around the collar – I used a ¼” seam allowance.
· Press the seam allowance towards the shirt and topstitch. If there is an open area of sweatshirt left after you stitch all the way around, you can zigzag or serge the edge if you wish. (I ended up taking a “tuck” in this open area to snug the collar up a bit – and can let the tuck out as my son grows)
 Stitching the Cuffs
· Fold the cuffs in half and in half again, finding four points around the circle and mark them with pins. Do the same with each sleeve.
 · Turn the sleeve inside-out and slip the cuff inside the sleeve so that the pieces are right sides together.
· Match the pinned points and pin the cuff and sleeve together at those points (again, be sure you are pinning into the extra bit of sweatshirt material you left and not the cuff itself). Then stretch the cuff and pin the shirt to the space in between, tucking and easing as needed.
· Stitch around each sleeve.
· Press the seam allowance towards the shirt and topstitch.
Fitting
· If the neckline and cuffs are a bit too large on your child, simply take a tuck in them and topstitch. As your child grows, you can remove those stitches to extend the use of the smock.

 Boy do I love my brother! There were four shirts rolled up in this little bundle!
 The bundle before I opened it - even the furoshiki is great fabric!
 The contents all stacked up.
 The smaller fabrics - probably about 1/2 yard each.
 The larger pieces -I think about 1 yard each.
 In the midst of everything else I have been working on - I have managed to put together more than a few more Maggie bags - and I have a few more planned as last minute little gifties (The Munchkin's teachers will all be getting them).

