Sunday, September 19, 2010

oh I don't have a witty post title tonight... just read it!

The post below is very photo heavy and contains not only the "booty" (fitting word for today - since it is International Talk Like a Pirate Day) from yesterday's shop hop - but also a few other goodies that have crossed my threshold in one way or another recently that I had not yet had the chance to show off.

We'll start with yesterday... three shop stops... three bags .... four pictures.

Fat quarters from our first stop, Chestnut Bay Quilting. This shop has a wonderful selection of batik fabrics and Civil War reproductions, and the owner also has some wonderful original pattern designs. The two little rolls were from a shop hop held previously - and were a little "bonus" gifty... the big black yo-yo is actually attached to the quilt underneath - more to follow on that in a future post.
Our second stop was Mt. Pleasant Quilting Company. They were celebrating their 'birthday' and had a tent sale with 50% off bolts and yardage. The pink dot to the right I picked up in the tent and will be a backing fabric.

The measuring tape fabric is a new fabric line - sorry I don't know the name right now and the yardage is upstairs. When I first spotted it there were only FQ's on the shelf (and only 2 left of those) and the bolt was AWOL. The wonderful staff there went hunting it down, and I was able to get a yard off it without having to throw any elbows! :-) I ran into another quilting/Lions Club friend there... which was great fun. We are already making plans to have our own mini one-day retreat with a small group locally. That should be fun - and maybe something we can do this winter.
At our third stop, Material Rewards Quilts, I spent a lot of time just going through the entire shop very slowly. The previous two times I had been in the shop it was their Christmas in July - and so the shop had always been very crowded.

I found some fun fabrics in here, including (L to R) the chickens for my neighbor, the white "glow in the dark" for Halloween and the Munchkin's bedroom, and some fabrics to make some 'candy corn' gifties. I also picked up this great Nativity fabric panel to do a wall hanging - will be fun to have the Munchkin decorate the hanging, as each element hangs from a ribbon on a button.

Prior to the shop hop, I had been dangerously surfing the web and checking in on a few fabrics I had been coveting. When they went on clearance, I went a little crazy....

These are mostly 1/2 yard cuts - I am planning some projects in orange and brown - and I just love them all.

Then I had to buy some border fabric for a project, and since QuiltvilleCreations.com was having such a great sale at the time, I picked up some other items as well.

And last but not least - this was a giveaway prize that I won from Quiltmaker magazine on their blog. They were giving away the fabric left over from making the samples from their latest issue I won the leftovers from Practical Magic, and when I won they told me I would probably have enough to make the pattern from the leftovers.

'Scuse me but there are nearly 12 yards of fabric here!!! 12 yards of yummy batiks!!! I think I will be able to make it - and then some!!!

So all these should keep me busy for a while... if nothing else I will be busy figuring out where to stash them until I am ready for them!

I did not take many photos at the quilt show -and did not pick up anything from any of the vendors. The few pictures I did take I will post tomorrow -they were mostly pictures of parts of quilts for future reference and inspiration.... do others do that, too or do you always photo the entire quilt? I think I only have 2 quilts full size shots - the rest are just little bits.

Saturday, September 18, 2010

And to think we almost did not go...

So here was the conversation (super duper condensed version) from about 2 weeks ago.

ME: Shellie - there's a quilt show in North Chili in a few weeks... want to go?
S: Sure - that would be fun.

A few days later...

ME: Shellie - Mt. Pleasant is having their anniversary sale the same day as the quilt show, want to go?
S: Sure - that would be fun!

A few days ago...

ME: Shellie, you've not been to Material Rewards yet, have you? Why don't we drive all the way there (about an hour from here) and then work our way back, hit Mt. Pleasant and then the quilt show. We could even grab breakfast at the diner.
S: That sounds doable!

During the midst of my Thursday/Friday work chaos - the texts flew...

S: Do we want to deal with the crowds at Mt. Pleasant?
ME: Do we want to drive all the way down to Material Rewards?
S: Should we just go to the quilt show?
ME: Do we want to leave early and get to the shops before they open?
S: Or we could take our time and let the early birds clear out. Will that work?
ME: I dunno...
S: I dunno either...

So we finally decided to grab breakfast here in town, head to Material Rewards and see what happened.

The day dawned bright and clear, the breakfast was yummy, and we were energized...

ME (walking back out to the car): Can we stop at that shop in Caledonia - the one I've never been to before?
S: You mean Chestnut Bay? Sure!!! :-)

Chestnut Bay (which I LOVELOVELOVE!!!) to Mt. Pleasant (awesome sale!!!) to Material Rewards (huge selection) to a quick run through McDonald's and back to the quilt show. 100 miles on Shellie's car (thanks for driving, Shell...) ultimately for a quilt show that was no more than 5 miles from home!!!

What a great day!!!

Pictures to follow soon.

ME: Good night everyone!

Friday, September 17, 2010

Winner -and a bonus!

OK - I can't get my random number generator thingy to give me a picture - but it gave me a number - 124.

124 out of 162 eligible entries (lots of "no reply" commenters - sorry I could not count those... maybe next time!?) - including lots of new (and current) Lazy Girl facebook followers and Yahoo Group members!! Welcome everyone!!! Hope you enjoy Joan's little Lazy world! It's tons of fun!

I did learn over the last few weeks that there are purse contents ranging from rocks to dragons (little ones), robots (of LEGO) to Barbies, and crafters staples like projects and swatches and tape measures. Even some un-baked bread dough (with a great plan for baking it on site for fresh yummy goodness), some freshly harvested veggies, and some (gasp) melted chocolate!

Some sounded like archeological digs -with old fashioned diaper pins from kids older than I am (and I'm not tellin' how old that is) - and another carted some live bugs (well enclosed in a zip top bag I am told).

Some are definitely bags belonging to moms and grandmoms - with various articles of clothing, toys, diapers, school stuff, etc.... while others are owners following their dogs - or even carrying them!!!

The pictures of the projects were great "eye candy" and have me itching to go out and get some more fabric to dress up my Lazy Girls in some different colors! Wonderful work everyone!

So who was lucky #124?? Well -I numbered in reverse order from when the comments came in - so a higher number actually favored an earlier entry. When I counted back to who it was - it turns out it is Jennifer! This is kind of fun - as I sat across the table from Jennifer at my first ever quilt retreat - and watched her make her first ever Lazy Girl bag - a gorgeous Runaround!

Congratulations Jennifer! I can't promise to get to the post office as I am off to a quilt show and mini shop hop tomorrow - but I will get it out to you soon.

The bonus? I decided to splurge and give a pattern away to the purse content that made me laugh the most... and I think it had to be Theresa's bearded dragon -cause all I can picture is a teeny little lizard poking its head out over the top of my Lily - kind of like carrying around the Geico gecko?

Thanks for playing everyone! Lets do this again soon, shall we!?

Tuesday, September 07, 2010

Giveaway: Lily Pocket Purse

Anyone who has been reading here for a while knows I am a HUGE fan of Lazy Girl Designs. Well, Joan has gone and won me over again with her latest design - the Lily Pocket Purse.

"Flirty, fun and full of pockets to stay organized. Lily is a handy, dependable and stylish companion. Wear Lily from your shoulder or cross-body to rest comfortably and securely at your hip."

This is my first Lily - done up in Moda's Happy Camper fabric. Lily features this cute pleated front ... and on the back she has a great little cell phone pocket. Interior pockets, and a top velcro closure round out her "take and go goodness."

My Lily has already been to work (which often involves cross-campus hikes), to the playground, to the baseball park, to the Dr's office, to the grocery store, to the farmer's market, and to the quilt shop. She's held up to every trip like a trooper - giving me easy one handed access while still being secure, lightweight, and just downright FUN.

She even held TWO baseballs, three pairs of sunglasses, a wallet and a camera - all in one evening!!!

I'd like to share Lily's wonderfulness with one of my readers - so I am giving away one Lily Pocket Purse pattern... (just the pattern - you provide the rest!)

There are multiple ways to enter - for a total of 4 possible entries per person:

1. Leave a comment on this post, telling me the most unusual thing you've carried around in your purse recently (my son's baseballs were in there longer than I would like to admit!)

2: Become a fan of Lazy Girl Designs group on Facebook and come back here to leave me a comment that you did (or that you already are).

3: Join the Lazy Girl Designs group on Yahoo, and come back here to tell me you joined (or that you are already a member).

4: If you have ever made a Lazy Girl Design's pattern - send me a link to a photo of your finished project! I love to see how other people's fabric choices make these patterns come alive!

Entries will be open until 5:00 PM Eastern Daylight Time on Friday, September 17th - so I can draw a winner and get it in the mail on the 18th!! (at least I have good intentions to do that!)

(oh - and this is the back of Lily - with that great and handy little outside pocket! It's deep enough for my LG enV 2 phone to ride
in quite securely and comfortably... plus a great spot to showcase some funky fabric or embroidery or other embellishments!)

ADDED NOTE: If I can't contact you - you can't win - so please be sure your contact information is either included in your message (email is fine) or that I can click on your name and find it easily in your blogger profile. If you don't get an email back from me -you are not entered!!

THANKS ALL - This Giveaway is now finished.

Sunday, September 05, 2010

Tutorial - Upcycled Child's Art Smock

Upcycled Child’s Art Smock

Quickly turn a men’s dress shirt into a long sleeved art smock that your child can put on all by themselves.

Materials:

· Men’s dress shirt

· Sweatshirt (with neck large enough to fit over child’s head and cuffs large enough to fit over child’s hands)

· Thread

· Sewing Machine

· Scissors

· Pins

Instructions:

Preparation

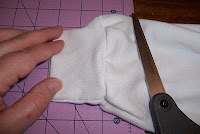
· Remove the cuffs and collar from the sweatshirt, leaving approximately 1” of the sweatshirt attached to each. (I used a new sweatshirt that I plan to use for a quilted sweatshirt jacket, but you could use any sweatshirt – this would be a good new life for a stained shirt)

· Remove the collar of the dress shirt, cutting just below the collar line.

· Try the dress shirt on your child, having them put it on backwards, and see how long you want the sleeves to be. You are adding a cuff that will hold the sleeve up, so you can work in some “growing room” in your finished length.


o Remove the lower sleeves of the dress shirt, cutting as straight across the sleeve as possible.

(NOTE – save the buttons off the cuffs for future projects –and if your shirt is 100% cotton, you can add the cut off pieces to your quilt scrap bin!)


Stitching the Collar

· Pin the collar piece to the top edge of the shirt, right sides together. Start in the center front and pin the dress shirt around the collar as far as it will go, overlapping the shirt ends in the back if needed.

o Be sure you are pinning and sewing into that extra bit of sweatshirt you left attached to the collar. You still want your collar to be able to stretch and you don’t want to sew it directly to the shirt.


· Stitch around the collar – I used a ¼” seam allowance.

· Press the seam allowance towards the shirt and topstitch. If there is an open area of sweatshirt left after you stitch all the way around, you can zigzag or serge the edge if you wish. (I ended up taking a “tuck” in this open area to snug the collar up a bit – and can let the tuck out as my son grows)


Stitching the Cuffs

· Fold the cuffs in half and in half again, finding four points around the circle and mark them with pins. Do the same with each sleeve.

· Turn the sleeve inside-out and slip the cuff inside the sleeve so that the pieces are right sides together.

· Match the pinned points and pin the cuff and sleeve together at those points (again, be sure you are pinning into the extra bit of sweatshirt material you left and not the cuff itself). Then stretch the cuff and pin the shirt to the space in between, tucking and easing as needed.

· Stitch around each sleeve.

· Press the seam allowance towards the shirt and topstitch.

Fitting

· If the neckline and cuffs are a bit too large on your child, simply take a tuck in them and topstitch. As your child grows, you can remove those stitches to extend the use of the smock.

Print Friendly Version