Wednesday, December 31, 2014

Endings and Beginnings

I don't know that I have blogged enough in 2014 to do a "year end recap" though it has been a productive year.  Planned projects were finished (mostly), unplanned projects were finished, and even a few UFO's were ... well... moved further along in the process.  I even did two craft shows!


2015 starts another trip around the sun.  I wonder what lies in store for the year ahead. More frequent blogging, perhaps?

Happy New Year! (and now I am off to bed - well before midnight - to remain in earshot of a child who is ringing out the old year with a stomach bug - may his new year be healthy!!! And yours, too!)

Sunday, July 06, 2014

Collage of the heART

This is a post I didn't really want to write about - but I want to document this quilt, and tell a bit about the very special person I made it for.

Bruce Greene was THE art teacher in my school.  His wife Susan taught elementary school art, and Bruce taught Junior High and High School.  We are talking small school here - graduating classes of approx 55, and K-12 all in one interconnected building.... often riding the same school busses to and from school.

Everyone had the Greenes as teachers - even if you didn't study art in High School (like I didn't), you at least had 2 years with Mr. Greene in Junior High.

And he was good! He was one of those teachers that left a strong impression in his students.

Unfortunately - I learned about a month ago that Mr. Greene was very ill and not expected to live much longer.  3 months, I was told.

My immediate response?  Make a quilt.  My next thought? Make a quilt and ask my siblings to contribute their own thoughts and blocks to it.  Then I got this crazy idea to jump on Facebook and ask all my classmates, my school mates, Mr. Greene's former colleagues, friends - anyone who wanted.

Send me your blocks.  Send me your names.  Send me whatever you want - and I will be sure it gets into this quilt.  Just send it FAST!!!

And they responded.  The depth of emotion, the creativity, the trust they put in me to put together their words into a tribute to a beloved teacher... it was a surreal couple of weeks as I put this together.

I mailed it out on Monday, June 23rd and it arrived on the 24th.
12 days later I received the news that Mr. Greene had died.

But he spent some time wrapped in our "Collage of the heART" - wrapped in gratitude, admiration, and love.

Thank you, Bruce and Susan Greene - you planted the seeds of my art, gave me roots - and then gave me wings to fly.

Soar high!


Monday, May 26, 2014

The Front Porch Back Story


Today my husband finished replacing the steps on our front porch - and there was much rejoicing.  Ostensibly, this was the completion of a 2 year project - started July 2012 - when we prepared to replace the decking on our front porch, realized the porch was rotted through, and ended up tearing out the porch AND the concrete steps AND the entire front sidewalk.

True to our usual style, we jumped in to DIY mode and figured it all out - or so we thought.


The porch was rebuilt the first season - but we ran out of warmer temperatures here in western NY and could not pour the new concrete for the sidewalk in time... and the stairs could not be replaced until the new concrete was down.

The concrete took us ALL of last summer.  Granted we ran into a few snags - like the mold we used to make our cobblestone looking walkway only held 40 lbs of concrete - but the instructions had said 60 - so we had extra from every batch that had to be cast into something or thrown away (no - not that!) - so birdbaths and stepping stones and more were made... it was a slow process.

And again - we ran out of good weather before we could stain and seal the concrete.

Finally - this spring, after ridding the sidewalk of thousands of baby maple tress, we got it cleaned and stained and sealed - and the step replacement began.

The true significance, however, is not the steps.. or the porch... or the sidewalk...

It is that during this time, hubby also replaced the front door AND installed a new lockset.

See - when we purchased our house in 2001, it came complete with a gumwood door and the original 1929 lockset - which was broken.  Because it was vintage - the door was cut differently than you would for a modern lockset - so it was either get that lock fixed ($$), buy another vintage lock ($$$), or replace the entire door ($$$$).  We opted to keep the door deadbolted (with blue painters tape holding the latch open) and come and go through the side door - which was the cost-free option.   We had never been able to use our front door as our main portal - we'd go in and out when we were home -but never had we come home and unlocked the front door to go inside.

Finally, after having a home heating assessment done, we realized that the old door was a liability and opted for the total replacement.  Finally - a lock that worked... but that happened while we were still without steps...

... so today was a first.  We left the house to go out for a Memorial Day picnic - exiting out the front and closing and locking it behind us - then coming home, up the steps, and opening up our front door to go inside.

It felt really really really good!


Sunday, April 13, 2014

Garden 2014

With 80 degree weather today (unusual - though welcome) I think we have finally shaken off the long cold winter that hit us this year.  Yesterday I was able to open up the house and wash 24 windows, and the windows in 3 doors - plus clean all the curtains.  AMAZING what a difference that makes - the fresh air, the clear view... who would have thought that cleaning would be so theraputic!
Today found me cleaning out the garden beds.  I didn't make it all the way around - if you've paid any attention to the pictures of my gardens - you may have noticed that I nearly have more garden than lawn.  Lets just say that Munchkin and I filled SIX big paper leaf/lawn bags today -and that didn't count the two that got filled last weekend, or the big pile of sticks we put at the curb.  I got the leaves and debris raked out of the front and side beds - everything from the back of the house to the back fence still has to be done - but truly isn't as bad.  The front beds collect the maple leaves - the back beds not so much.  It is mostly trimming out the dead flower heads that I left in for the birds.

It was also a good time to do some trimming - as with no leaves on the small trees and shrubs I was able to see where the crossed branches were and cut away to open things up.  I even tackled the rosebush - though I did not escape unscathed.

Not too much is blooming - crocuses, flag iris, snowdrops (lots and lots and LOTS and LOTS of snowdrops), and one little tiny daffodil just getting ready to open (snow forecast for Tuesday, Mom - right as always!)  The hyacinths are ready to burst out, and I can see the beginnings of the rhurbarb, strawberries and hops, along with many many other sprouts and buds and signs of life again.  YAY!

I even got busy with some planting!  I didn't do anything outside - I need to do some tilling in my raised beds and my garden claw has disappeared - so hopefully when we return from some Easter travels I will be able to get a new one and get in some of those early spring "cold weather" crops.  In the meantime, I have some lettuce and basil already sprouted and moved up to the next sized container in my "greenhouse", and I put in some seeds today.

It was 'thyme."


Saturday, April 05, 2014

Making haste slowly

On April 11, 2008 I received a pattern in the mail. Last night - I put all but the last border on my version of that pattern.

I am not quite ready to share my photos of the project - though a few of my Instagram followers did get a sneak peek when I was asking for advice.  Lets just say it looks NOTHING like the original pattern.

This was a project that I collected fabrics for over a long period of time - they were my travel squares, my shop hop buys, and my memories of my adventures.

Working on this again after a long hiatus has been a walk down memory lane... and I am finishing it in a way that is reflecting some more recent memories -some happy, some sad, but all of them treasured.

Maybe that is why this one has taken so long - it needed more memories to make it complete.


Monday, March 31, 2014

Wraparound Shot

So, I do a lot of sewing that ends up at my neighbor's house.  Two quilts for her boys when they were born, one for her, the TARDIS and the Millennium Falcon as gifts she commissioned.... so she and I had discussed how I was shamefully neglecting her hubby -and what I should make for him.

He is a hockey player - but a jersey quilt was not going to be realistic because of the types of fabrics involved.

He is a Boston Bruins fan - so perhaps a logo quilt?

I pondered this for nearly a year.  I even acquired a panel of an ice rink to stash away for a backing when I was ready for it.
And then I found a tutorial online for a Broken Wheel block. (if I can find it again, I will repost it - but I can't find the link right now.  It was metric - so some kind non-US blogger sharing talents!)  The broken wheel looked similar to the Bruins logo- not identical but similar enough that it caught my imagination and I thought I could have fun interpreting it.  I dove into my stash for golds and blacks (including some golds left over from the Millennium Falcon and blacks left over from the camera quilt), added a bit more gold and some black yardage - and hand built a "B" for the big block.  I printed the logo from a coloring page, cut out the large B in black, and then the accents in gold - zig zag stitching all around each both inside and out.  It gave it the texture of a vintage high school sweater letter.
I quilted it in concentric circles as I felt that would work best from both the front and the back.  They were a bit wobbly in some parts, but so are hockey skaters, right?  It's not like figure skating with perfect figure eights, right?   Once again my variegated Aurifil threads came in handy - adding some dimension to this essentially three color top without taking over.  There was a black based variegated on the top and a primarily slate blue variegated on the back.


Saturday was his birthday - so "Wraparound" was given to him then.  I wasn't there -so don't know how he feels with my interpretation of his beloved team... but now their family of quilts is complete.

Unless I make one for their dog?
 

Sunday, March 30, 2014

Photo Finish

This is finish #4 for 2014 - "1829" was a donation quilt for RIT's United Way campaign and was put into an online auction, with the proceeds going to the local United Way. I've been planning this quilt for a while.

 I had seen the pattern on the website All People Quilt, and had been visualizing it, collecting the "camera body" fabrics, and collaborating with a photographer friend for the photographs of RIT.  There are 20 different photos from well known sights on campus, different buildings, seasons, events and landmarks.
 
I used iron on transfers for the photos - as most of the other methods I have seen do not have the durability when washed, and I was not sure who would be receiving this quilt and what they would be using it for.  Nearly all the camera bodies are different fabrics, but each shutter button is the same, as are all the "flash cubes."
I wanted it to be hangable if the winning bidder wanted, or useable as a lap quilt -and as much as I don't like square quilts, this one ended up 58x59.  I widened the sashing from the pattern and unified it in color to make the cameras float. 

The orange is our school color, so I put in one orange camera and a narrow orange strip between the body and the border - and the tag on the back is a "Polariod" of my co-conspirator and I.


Sunday, February 23, 2014

Kessel Run

This quilt was another challenge from my next door neighbor - the same one who challenged me last year to do a TARDIS quilt.  Her request - the Millennium Falcon.

After much googling and pondering and wondering - I came across a poster by an artist named Szoki that would serve as my inspiration.  Connecting Threads provided the perfect fabrics to paint my picture, and I set to work.

This project was made in three parts.

First I determined the finished size of the quilt (62x84) and cut a muslin rectangle a bit larger than that.  I then started attaching the rust colored strips to that foundation - stitching, flipping, pressing, basting raw edges, then repeating - and repeating - and repeating.  That took a VERY VERY long time!!  And as I worked and added, the quilt got heavier and heavier.  I was essentially working with the entire quilt body right from the beginning - and my shoulders felt it on this one.

The second part was making the Death Star. That was pretty easy, actually.  I looked at a number of pictures and art of the Death Star online, and then just pieced together my impression of what it should look like.  I was going for a techno feel with lots of trenches going across.  I was piecing the lower quadrant, so I didn't have to worry about the big dish/weapon area, as that is always shown up above the equatorial trench.  That made my task easier.  I made it bigger than it needed to be - because I knew I was going to cut it down and wanted to be sure I had enough to play with.

Once the Death Star was pieced, I made a giant pattern out of kraft paper so that I could cut the pie wedge out of the Death Star as well as out of the body of the quilt.  I stitched it just like a mini drunkards path block -only with a radius of 31"!!!  That was a tense step -but it worked out very smoothly.

The third - and most difficult - step was making the Falcon.  Matt did his magic in Corel Draw, taking the outlines of the image from the poster and converting it into something I could use with fabric - plus making it much much larger.

I printed it out on 9 sheets of paper and then pieced it together to make my pattern, first laying it out on top of the quilt to see if it was in the proportions I wanted.  In these pictures you can various stages of my testing.  You can also see the muslin foundation peeking out from the corner before the Death Star was attached.

We played with various placements of the Falcon but ultimately Matt felt that we should have it "flying" along the lines created by the diagonal strips, so that is what we stuck with.

To make the Falcon, I first cut the full outline out of a dark dark blue fabric (actually leftover from the TARDIS!).  I then took the various sections you see in white and traced them onto freezer paper - simplifying the design even more by making the sections larger.  I ironed them on to the front of a slate blue fabric and the cut each one out.

I did not want to add the bulk of fusible adhesive to this project -since the area near the Falcon would ultimately have 6 layers of fabric (backing, batting, muslin, rust strips, dark blue and slate blue) - so I used a product called Lapel Stick to hold the pieces in place while I stitched around each piece.  It worked quite nicely and held them steady.  I chose to do a raw edge applique because it is the "fastest hunk of junk" and I wanted to have that raggedy feel.

Once the Falcon was done -the quilting began.  I worked on the diagonals first - doing many many closely spaced lines along the strips, in the middles, on the edges.

Next came the Death Star - horizontal bands of quilting following the lines of the trenches.

And then I started quilting the Falcon... and quilting the Falcon... and quilting the Falcon.  I think I put more thread into this quilt than any I have ever done.  Outline quilting, free motion quilting, straight line detail quilting, more outline quilting....

And then it was done.. and then it was washed... and then it was photographed... 
Death Star - notice the change in binding color at the edge of the Death Star
The Falcon

Falcon detail
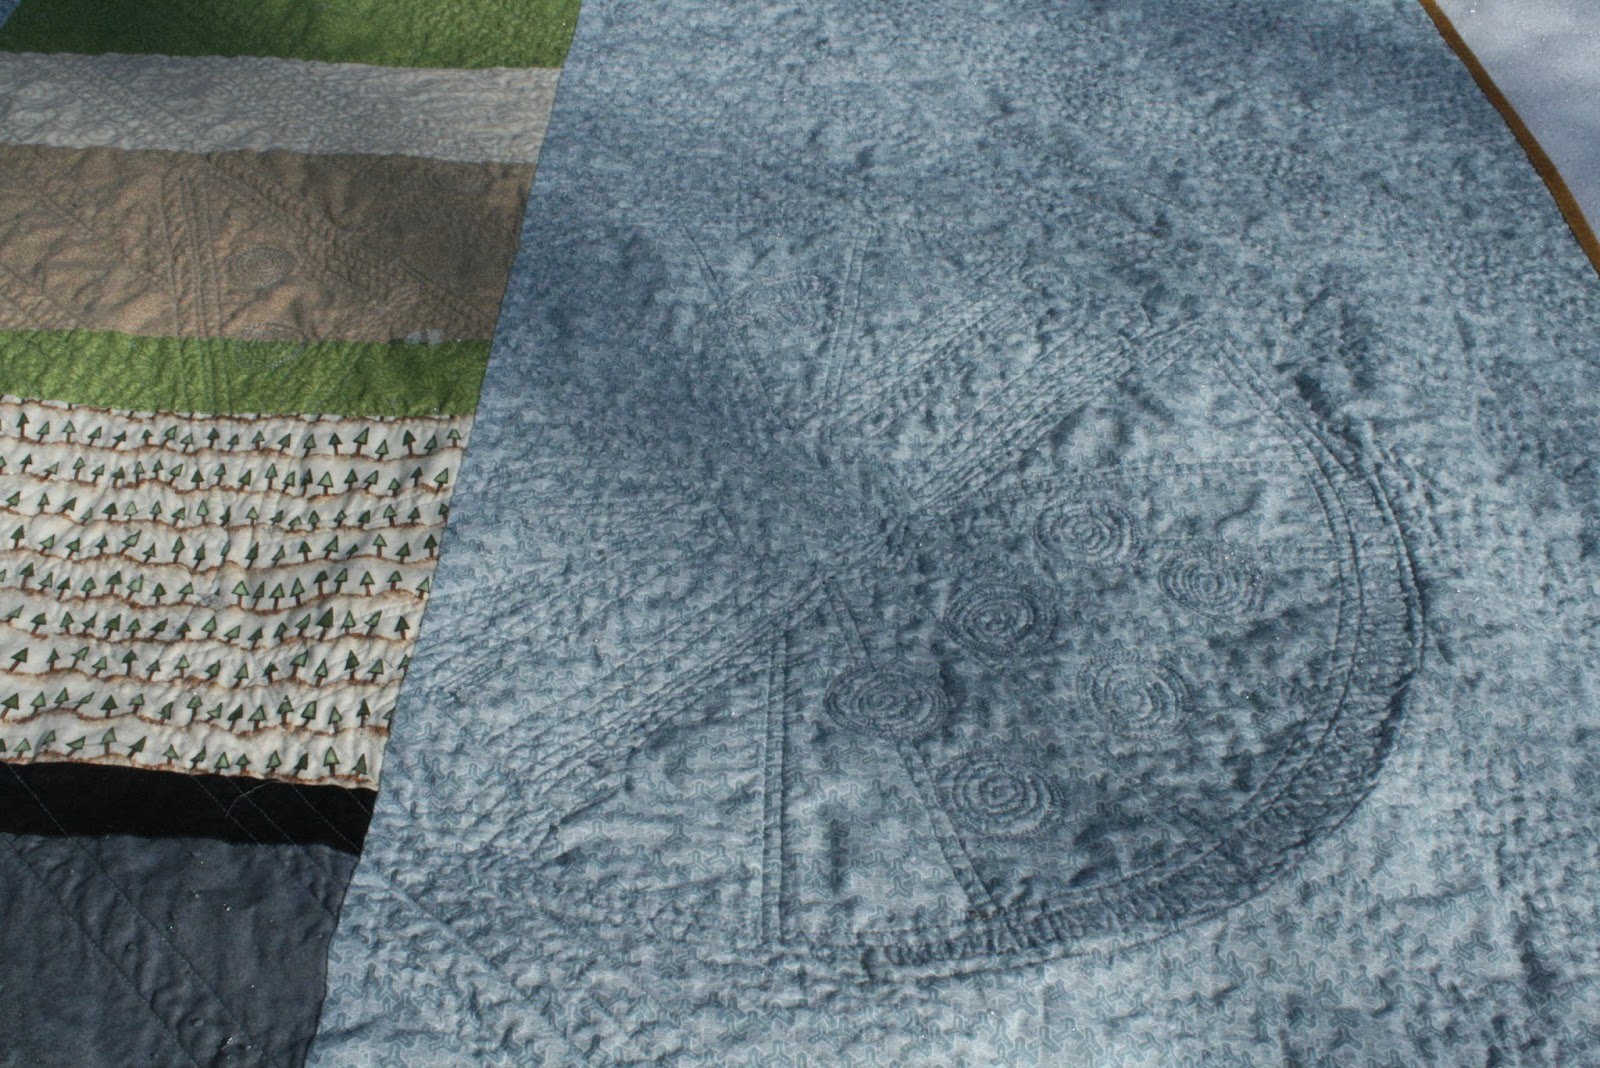
I like how you can see the Falcon on the back... and how much this one crinkled!!

Each strip of fabric on the back represents a location in the original Star Wars trilogy - in order from top to bottom.  This photo show the Death Star, Hoth, Asteroid Field, Dagobah and Cloud City.


and then it was delivered.

Truly a bit sad to see it go - but I know it will be loved.